First, you'll need to install the plugin to Unreal Engine and enable it from the plugins menu (Edit > Plugins). Once enabled, Flipbook Toolkit can be opened from the main toolbar under Window > Developer Tools > Flipbook Toolkit.

On the left side are the two preview panels. On top is the animated preview, and on the bottom is the flipbook overview. The flipbook overview pane also includes overlays for the currently selected frame range and the currently displayed frame. On the right side is the settings panel. You can click and drag on the borders between these panels to resize them, and you can click on the headings in the settings sidebar to collapse or expand sections.

This section is where you set up the flipbook itself. On top is an asset picker; you can either click on it to open the asset picker dialog, or drag and drop a texture from the content browser.
Below that is where you set up the layout and framerate for the flipbook. The two "frames" sliders are for the number of columns and rows in the flipbook, respectively. The FPS slider sets the framerate the animation will play at.
Note
If a texture filename ends with "_#x#", where the #'s are the dimensions of the flipbook grid (for example, "_8x8"), then the dimensions will be set automatically when the texture is loaded. The included public domain flipbooks use this format.
The included public domain flipbooks can be found under Flipbook Toolkit Content > Flipbooks (be sure to enable "Show Engine Content" and "Show Plugin Content" in the view options).

Here are the main playback controls for the viewer. The Start and End fields on the left and right determine the range of frames you want to view. You can click and drag on the big slider in the middle to sweep through the frames, and when playing, the slider updates to match the playback position. The "Current Frame" section is self-explanatory: it just shows the number of the current frame.

From left to right, the buttons in this section are:
- Jump to start of frame range
- Step back one frame
- Play backward
- Pause
- Play forward
- Step forward one frame
- Jump to end of frame range
- Loop mode selector (see below)
The loop mode selector cycles between three modes:
- Loop: Loop through the selected frame range in one direction.
- Ping-Pong: Bounces back and forth, reversing direction whenever it hits the end of a frame range.
- One-Shot: Play until it hits either end of the frame range, then stop.

The top row contains background settings. Click the colored rectangle to open a color picker and choose a background color. The slider on the right sets the opacity of the checkerboard pattern in the background.
The colorful R G B A letters are buttons for toggling each layer of the flipbook display. Disabling the alpha channel will, predictably, disable transparency in the preview. The red, green, and blue layers can each be toggled and displayed in any combination. With only one channel enabled, that channel will be displayed by itself in grayscale. With one color channel and alpha enabled, the color channel will be displayed in grayscale with transparency from the alpha channel.
The Blend Mode dropdown lets you pick between three blend modes:
- Translucent: Regular translucent rendering, with opacity controlled by the alpha channel.
- Additive: Brightens the background color based on the intensity of the texture colors. Literally adds the colors. This mode can only brighten things and will be invisible against a white background.
- Modulate: Darkens the background color based on the intensity of the texture colors. This mode doesn't subtract, it multiplies the background colors by the sprite's colors. Modulate can only darken things and will be invisible against a black background.
The Grid Opacity slider determines the opacity of the grid overlay in the flipbook overview panel.
The Tiling Preview checkbox toggles a 3x3 tiled display of the animation, useful for seamless tiling animated textures.
Note
Sadly none of the public domain flipbooks included are for seamless tiling. A good example of one can be found here, although I couldn't include it in the plugin itself for licensing reasons. (Look for the "Spritesheet 6 x 6" download under "Flat Maps - Animated")

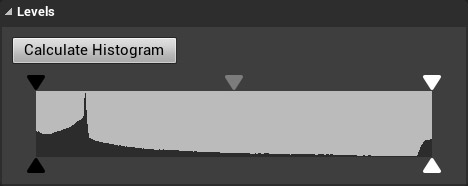
This section contains settings to tweak, clamp, remap, and otherwise adjust the brightness levels in the image. If you've ever used the "Levels" adjustment layer in Photoshop, this works the same way!
The histogram is the graph in the middle of this section. It shows the distribution of brightness values in an image, with darker pixels to the left and brighter pixels to the right. Upon first loading a texture, the histogram display will be blank. You can hit the "Calculate Histogram" button to, well, calculate the histogram. I decided to make this is a separate action since it can take a second or two for larger images, and I wanted image loading to be fast.
The arrows above and below the histogram can be dragged left and right to make adjustments. The black and white arrows on top are used to clamp the input range of the image. The black arrow chooses the lowest brightness value to accept from the image, and the top white arrow chooses the brightest. The pixels between these two points will then be remapped to cover the full output range. Pixels brighter or darker than the white point or black point respectively will be clamped to full white or full black in the output.
The gray middle arrow on top "skews" the brightness values up or down, making the whole image darker or brighter. If you've ever used a "gamma" adjustment slider, this does the same thing.
The bottom two arrows set the output range. The values adjusted by the top arrows will be mapped from the black point to the white point on the bottom. If you bring the black arrow up halfway, the output image will contain pixels starting at middle gray and going up to white, and the opposite will happen with the other arrow. Notably, you can swap the order of the output arrows to invert the output!
Note
If one of the arrows on top gets stuck behind another one and you can't get it back out, you can right-click the arrow area to reset the arrows to their starting positions.

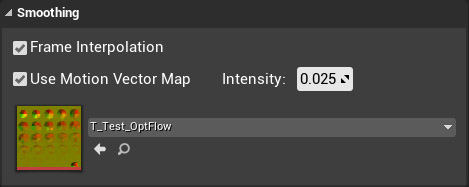
The top checkbox here enables linear interpolation between frames. Basically, it smooths out the transition between frames.
The second checkbox allows the use of a motion vector map, or "optical flow" map, which contains direction vectors to help make things even smoother. This is a bit of an advanced topic, and the plugin doesn't include any motion vector maps, so you're on your own for this one. The "Intensity" field does exactly what you think: it controls the distortion amount.
Note
Motion vector map support is a bit wonky and I can't seem to figure out what the issue is. Hopefully, I'll fix it in a future release, but as of right now, smoothing using motion vectors ends up looking a little weird. Sorry about that.

The Colorize Mode dropdown selects between the 3 available colorize modes:
- None: Okay, this isn't really a mode. No colorization applied.
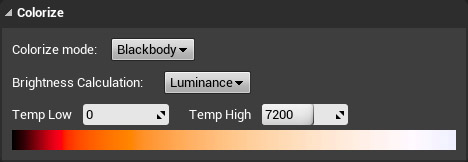
- Blackbody: Colorizes the image using a Blackbody-based gradient.
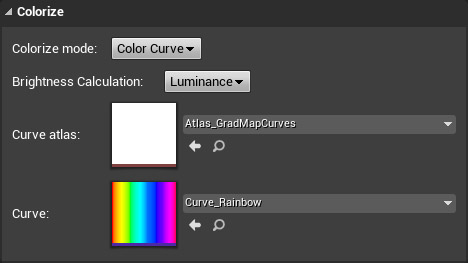
- Color Curve: Colorizes the image using a user-defined color curve.

Both colorization modes have a Brightness Calculation dropdown which determines how the 3-channel RGB image gets mapped to a 1-dimensional gradient:
- Luminance: Uses perceptual brightness (ITU-R BT.709).
- Normalized Sum: Sums all three RGB channels and divides by 3.
- Max: Uses the maximum value from the three RGB channels.
Blackbody mode also has low and high temperature fields, which determine the extents of the Blackbody gradient to use. Below them is a visualization of that portion of the gradient.

Color curve mode also has the Brightness Calculation dropdown, but it also has asset pickers below that for picking a color curve atlas asset, and then a curve from that atlas. (Unfortunately, you will need to make an atlas for your curves, even if you only use one curve. It has to do with how Unreal handles sending color curve data to the GPU.) The second asset picker will appear after picking a curve atlas, and should only contain curves in that atlas.
If you want to use just a portion of a color curve, you can accomplish this by adjusting the output range in the Levels section.
For any questions about using Flipbook Toolkit, you can ask by email (hello@trashbyte.io) or by posting a question on the Unreal marketplace product page. Please report any bugs you find to bugs@trashbyte.io, and include what you did that caused the bug to occur, if possible. If you want support for an older engine version, or for macOS or Linux editors, feel free to ask by email (hello@trashbyte.io) or by posting a question on the Unreal marketplace product page.