Welcome to part one of a 3-part series of tutorials on making custom Blueprint nodes in UE4. In part one, I’ll walk you through the creation of a Blueprint Library in C++. If you don’t know much about programming, don’t worry, it’s pretty simple! In later parts I’ll dive into the nitty gritty stuff, starting with defining custom “thunk” functions in order to properly handle wildcard parameters.
What is a Blueprint Library?
Quite simply, a Blueprint Library is a C++ class with a bunch of functions in it, which use some special UFUNCTION specifiers to automatically generate Blueprint nodes for each function. It only takes a few lines to create a custom node, so let’s jump right in.
Getting started
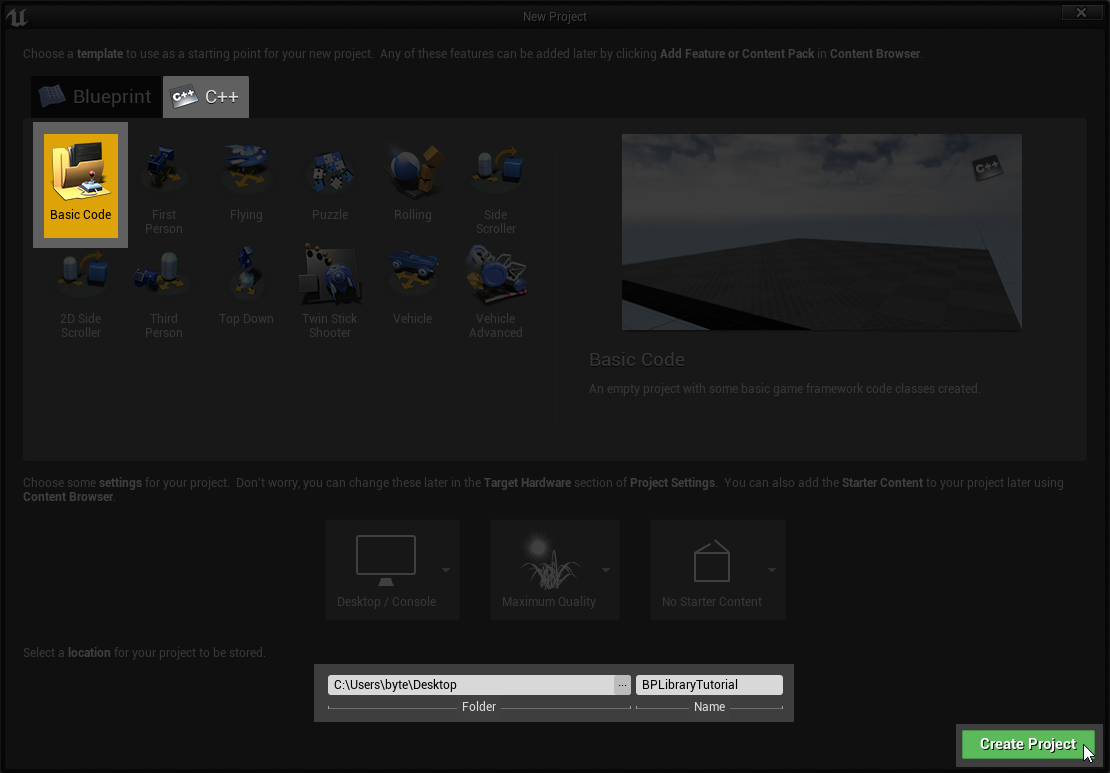
To start, open up an existing project or make a new one for this tutorial. If you’re making a new project, make a “Basic Code” C++ project. If, after hitting “Create Project”, it opens Visual Studio and just sits there without doing anything, go to the project folder and open the project file yourself.
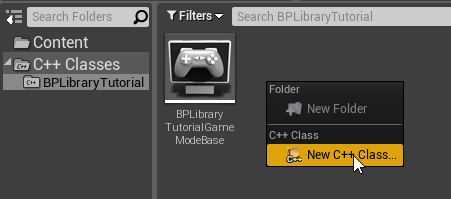
Go to “C++ Classes” in the content browser and open the folder for your project. Right click in the content browser and select “New C++ Class”.
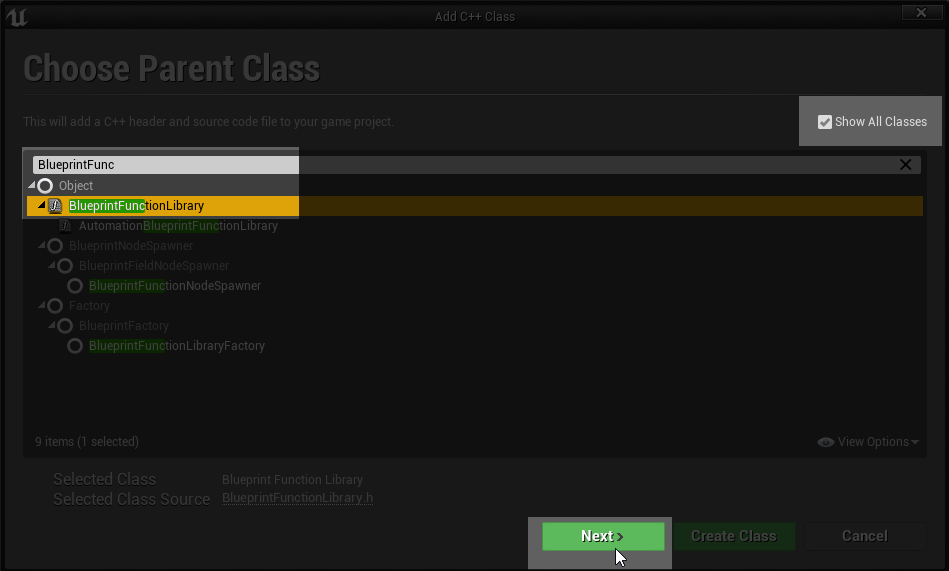
Check the “Show All Classes” checkbox in the top-right corner, and find BlueprintFunctionLibrary in the list (type in the search bar to filter the list).
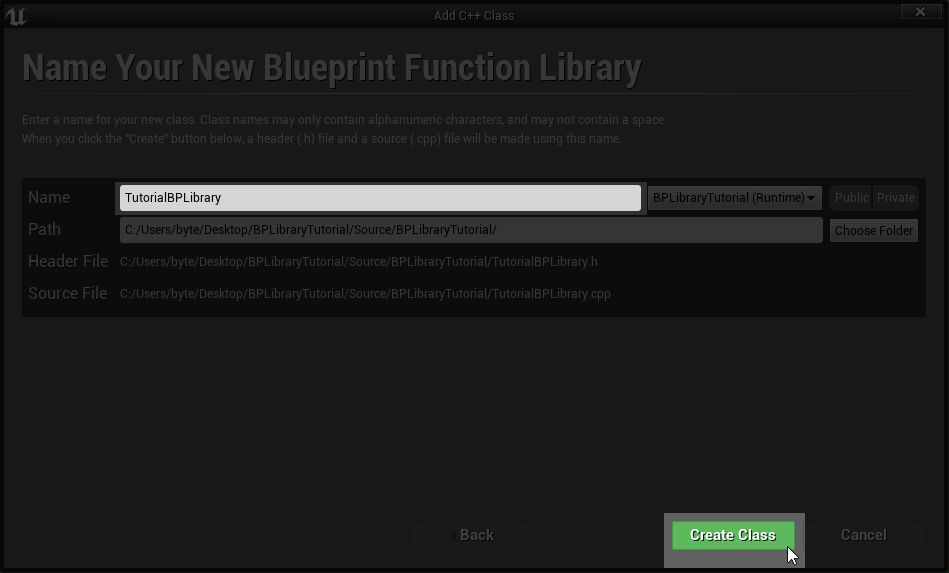
Give it a name and hit “Create Class”.
After it compiles the new class, the files for it should appear in the Visual Studio project. If VS isn’t open, you can open it with File > Open Visual Studio in the editor, or by opening the solution file in the project folder. You should have two new files: <YourClass>.cpp and <YourClass>.h.
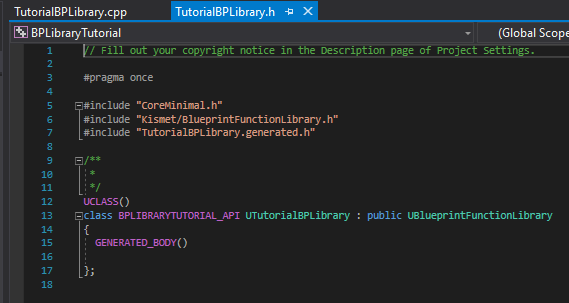
Start by opening the header file (the one ending in .h). If the files aren’t already open, you can find them and double-click on them in the “Solution Explorer” sidebar. They’ll be in the Source folder.
If you’re new to C++, classes are declared and defined in seperate files. The header file is where you declare a function, (or class or whatever) which lets the compiler know that it exists, including it’s name, return type, and parameters. This definition is called a function signature. The automatically generated class doesn’t have any functions in it, so let’s add a declaration. Inside the class body (between { and }), add the following:

The UFUNCTION bit isn’t part of a normal C++ function declaration, it’s a macro which Unreal Build Tool uses to do some stuff behind the scenes, like finding the function and creating a blueprint node for it. You can add parameters to this macro call to do all sorts of things, but for now we’re just using BlueprintCallable, which causes the Unreal Build Tool to automatically create a Blueprint node for the function.
The actual signature proper is static float SquareNumber(const float In);. The static keyword means that the function isn’t attached to instances of a class, it just exists all by itself. The next part is the function’s return type, which is what output the function returns when it’s done. In this case, this function will outupt a float. SquareNumber is the name of the function, and const float In declares a single parameter to the function, In, which is a const float. const is a C++ keyword that means you aren’t allowed to change the value. The Unreal Build Tool uses the const keyword to identify function inputs, while non-const parameters that are references are outputs. We’ll get to that in detail later. The semicolon at the end marks the end of the function declaration. Now, we have to actually define the function in the source file.
Open the source file for your new class (the one ending in .cpp). It should be totally empty except for a comment and a single line: #include <YourClass>.h. This is an include statement, which lets the compiler find declarations in other files. In this case, we only need… the header we just wrote, so we can define the function from it.
Below that, add the following:

This looks a lot like our declaration from before, with a few differences. First is the UTutorialBPLibrary:: part before the function name. You should replace this with the name of your class. What this means is that we’re specifically defining the function SquareNumber inside of UTutorialBPLibrary. The :: and the name before it specify a namespace, which means exactly what it sounds like, a space for names. Your class has its own namespace, that way we could define a different function SquareNumber in a different class without causing any conflicts between the two. Here, we just want to specify our class’s function.
The other difference is that instead of a semicolon at the end, there’s a pair of braces. That’s where the actual function code goes. The part where it does the things and stuff. In this very simple example, I’m just writing a function that takes a float as a parameter, squares it, and returns the squared number. We can write this in one line: return FMath::Pow(In, 2);. Here we see the :: symbol again, this time because we’re referencing a function in FMath, which is Unreal’s math library. The function is Pow, which rases the first parameter to the power of the second, in this case, In squared. Starting a line with return means that we’re done, and we’re returning what comes after it.
And that’s all the code we need to make a custom Blueprint node! The UFUNCTION macro in the header (specifically the BlueprintCallable part) will tell the Unreal Build Tool to generate all of the other necessary code for us. So, compile the project! You can do this in Visual Studio, by right-clicking on your project in the “Solution Explorer” sidebar and selecting “Build”, or by clicking the Compile button back in the main editor.

Once the compilation is complete, go back to the editor and open up a Blueprint (make a new one if this is a fresh project). Try searching for your new node by name. If it doesn’t show up, it’s probably because hot reload didn’t work, because hot reload never works. Close the editor and reopen it.
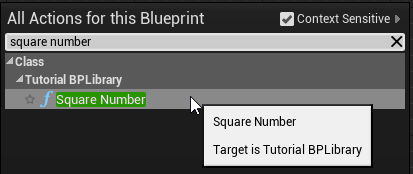
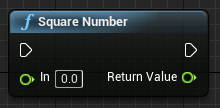
There’s our node! If you hook this up, it should square the number:
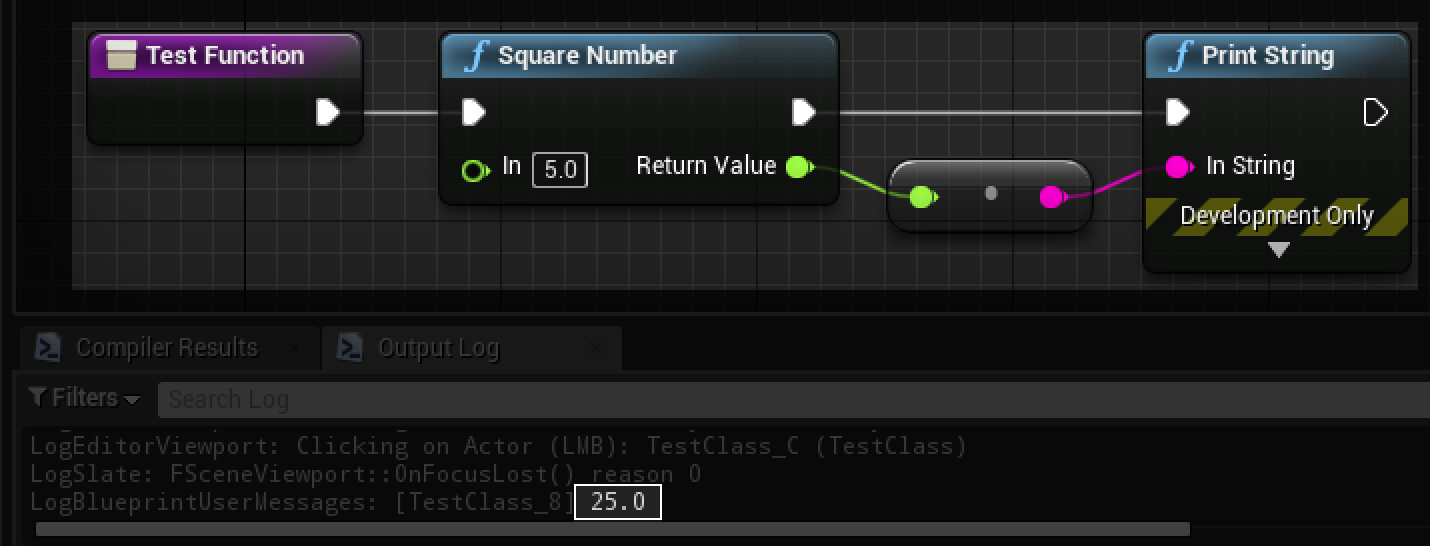
But this node doesn’t really need Exec pins, right? The square node that Unreal already has doesn’t use ‘em. Let’s go back to the header file and take a closer look at those UFUNCTION parameters. Time to add some more bells and whistles.
More UFUNCTION parameters

I’ve replaced BlueprintCallable with BlueprintPure. This turns it into a “pure” function, which for blueprints simply means it won’t have Exec pins. The compiler doesn’t enforce much, but generally pure functions aren’t supposed to modify anything; you should use non-pure functions with Exec pins for that, in order to force everything to execute in the right order. In this case we’re just taking one number and returning another, so it’s a good idea to make it pure.
Next, there’s the meta parameter. For some reason, some of these parameters are in a “meta” category, and so they have to go in here. I don’t really understand why; presumably it’s some technical implementation detail. Anyway, DisplayName lets you define a nice display name for your node, including any special characters that aren’t valid in C++ function names. Using CompactNodeTitle will make a node compact, which means it doesn’t have a title bar or names listed for pins, it just has one simple label in the center. The value for the parameter is the label that will appear on the compact node. Lastly, Category lets you put your node in its own category in the node selector dropdown. You can use the vertical bar character (|) to make nested categories, e.g. Utilities|Math|Float would appear under Utilities > Math > Float. There’s a whole bunch of parameters you can use, including adding extra keywords to search for a node. You can read about them all here. After recompiling, here’s what the node looks like:
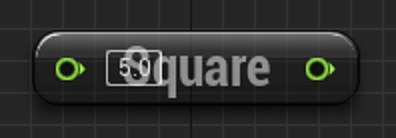
It’s compact! It’s pure! It…. looks kinda bad. The issue here is that the parameter input box overlaps the node’s label. There’s not a lot you can do to change the layout of a compact node, so to make things look prettier, I’ll change the parameter to a reference, which removes the ability to enter a value right on the node. In fact, I guess now is a good time to properly go over the different kinds of function parameters.
Here’s an example of more complex function:

I’ve split the parameters into multiple lines to keep it from getting too long. There’s a lot of little differences here. First, the function’s return type is now void, which means it returns nothing. Well, actually that’s not true. This C++ function doesn’t return anything, but the node will return something, in fact it’ll return two things. Functions in C++ can only return one value, but nodes can return several. Making a node with multiple outputs can be accomplished through reference parameters. OutputOne and OutputTwo are the two outputs for this node, and they’re designated as reference parameters by the & after the type. Any parameters that are non-const references will become outputs for the node (along with the C++ return value), and everything else will default to inputs. You “return” these values from C++ by simply assigning to the reference parameter, e.g. OutputOne = 5. OutputTwo is an AActor, which means it gets passed around by pointer (thus the *). Despite a pointer already being a kind of reference, output parameters still need to be C++ references, resulting in the somewhat silly AActor*&.
I’ve made InputOne a reference here (float&), which removes the input box like I was describing for the other node earlier. But, since it’s const it will still be treated as an input. I had to put InputThree at the end due to a limitation in C++. You can declare optional parameters in C++, providing a default value for them if they’re omitted, but they have to go at the end of the signature. The Unreal Build Tool will automatically set up default values on a node from any optional parameters like this.
Here’s what this node looks like:
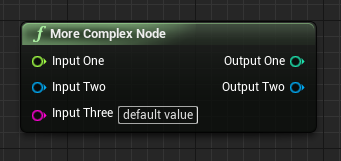
There’s the node, with the pin directions figured out by the compiler: three inputs and two outputs. The node is also pure, because of the BlueprintPure, so no Exec pins. You’ll notice that the string input has the default value I specified, and that the float input doesn’t have an input box, since it requires a reference.
By the way, here’s what the Square node from before looks like without the input box in the way:

A practical example
To round things out, I’ll walk you through one complete practical example: a function that checks whether an array is empty.

This one has some specifiers you’ve seen before, BlueprintPure, DisplayName, CompactNodeTitle, Category, and that Keywords specifier I mentioned earlier. It also has a new one: ArrayParm (No, that’s not a typo (well not my typo at least lmao). It’s spelled “parm” as in parmesan… for some reason). This specifies any parameters (separated by commas) that should be treated as wildcard array parameters. Meaning, we’ll be able to hook up any kind of array to this node. The return type is a boolean (true or false), and the one parameter is a const reference to a TArray of UProperty*s. Why UProperty? That’s the base class for all of the blueprint parameter types, and it’s necessary for the wildcard pin to work.
The function definition is very straightforward:

Array.Num() returns the number of elements in the array, and if that’s zero then the array is empty. You can put it all on one line like that because the compiler is smart enough to figure out that Array.Num() == 0 should be interpreted as a boolean.
Here’s what the node looks like:

As you can see, the input is an array pin, and it’s grey meaning it’s a wildcard and we can plug any kind of array into it. Once you connect one, it colors itself to match:

As an important sidenote, you can’t actually do anything with the array contents this way. To do that, you’ll need to specify a regular type for the array, or make a custom “thunk” function in order to get the necessary addresses to work with wildcard parameters, which I’ll cover in the next guide.
Where to go from here
Now that you know how to make custom nodes, you can harness the power of C++ any time you need high performance or complex algorithms, and you can do it from Blueprints. If you’re feeling adventurous, check out the list of UFUNCTION parameters and try some of them out. Most questions you’ll end up having can be be answered with some googling, but if you have any trouble with this tutorial, let me know! (on mastodon, twitter, or by email) I’d be happy to help.
The next guide in this series will be a good deal more advanced, covering the creation of custom “thunk” functions in order to get addresses off of the Blueprint VM stack, to properly work with wildcard parameters.
See you next time!