This is a hands-on tutorial about making sounds with modular synths. It’ll be a combination of an explanatory article and a tutorial. I won’t be providing audio samples here, so you’ll need to follow along on your own. Come on, it’ll be fun!
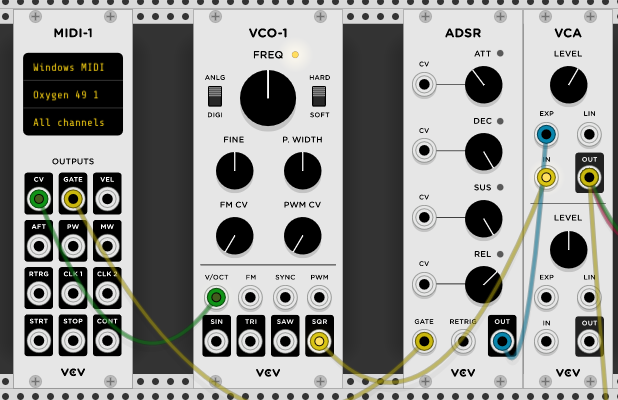
“Modular synths” are synthesizers made from discrete “modules” – individual components that perform a very specific function. They can be mixed and matched and interconnected in any way to make all kinds of sounds. Here’s what one looks like IRL:

I’d love for everyone to have access to this sort of thing here in meatspace, but the setup above is easily thousands of dollars. Luckily, there’s a completely free (and open source) software alternative available! It’s called VCV Rack and we’ll be using it for the rest of this article. (And for anyone who wants to use this with a DAW, there is a bridge plugin that can send audio and CVs back and forth!)
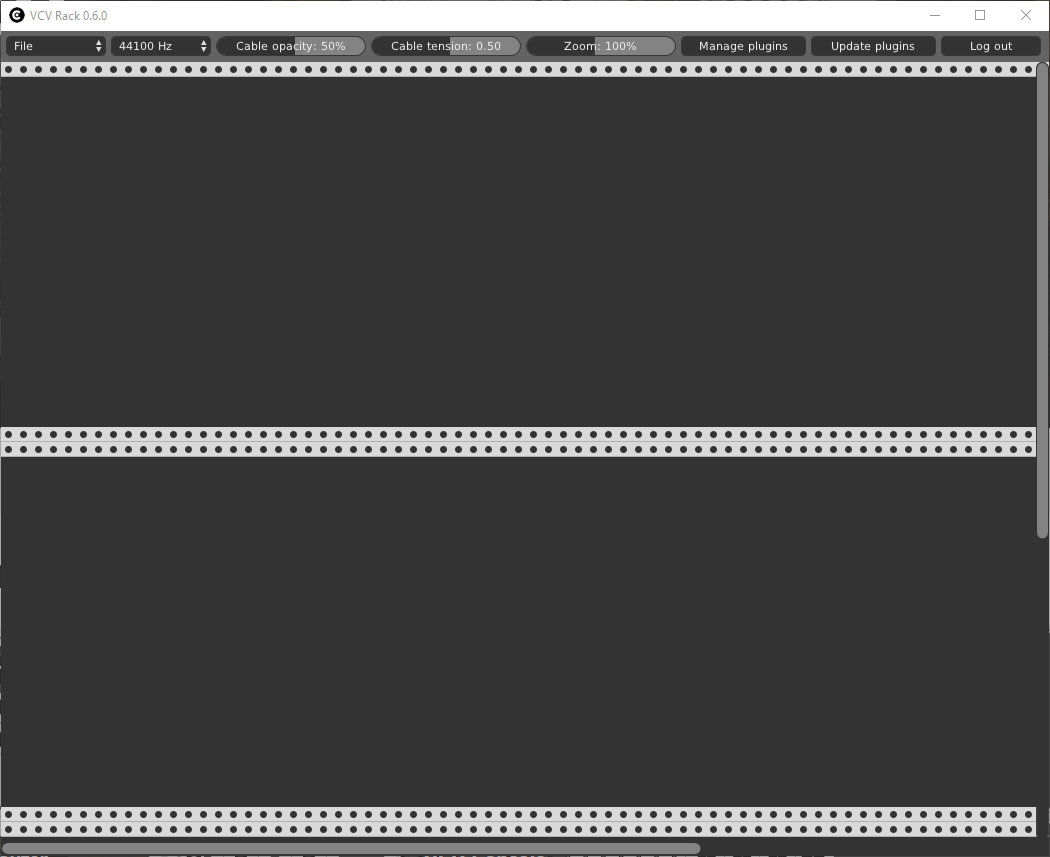
Start by downloading VCV Rack. It’s available for Windows, Linux, and MacOS. Once you’ve got it installed, open it up. You’ll see a blank rack like this:
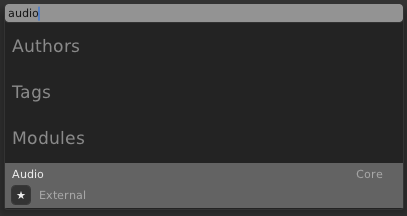
Right click in an empty spot on the rack to bring up the module selector. We’ll start with a basic setup to get some audio out of this thing. You can type in the selector to filter it. Find the “Audio” module and add it.
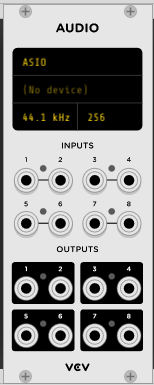
This module provides audio inputs and outputs, for getting audio in and out of VCV Rack. Click on the black text displays at the top to select your audio subsystem and output device. If you have an ASIO driver, or another low-latency audio driver, installed on your computer, good! Select that. If not, just go with whatever is standard for your OS. Windows has WASAPI and DirectSound, either will work. Then select your output device from the second menu.
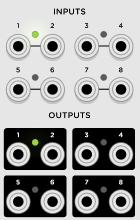
Once you’ve got the right audio device selected, green lights should show up next to the input and output jacks, according to how many channels your audio device has. Most likely, it has one stereo input and one stereo output.
Now we need some audio to hook up to it. But first, we’re gonna add an amplifier, to (ironically) make the signal quieter. The audio source we’ll be using will be full-volume, and I don’t want to hurt anyone’s ears. Right-click and add the “VCA” module. (That stands for Voltage Controlled Amplifier).
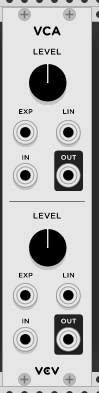
This is actually a dual VCA module, since there’s two seperate VCA circuits in it, the top half and the bottom half.
The knob controls the volume, and the four jacks are as follows:
- IN: audio input
- OUT: adjusted audio output
- EXP and LIN: these are exponential and linear CV inputs, respectively
Wait, what’s a CV? That stands for Control Voltage, and it’s the term for a signal used to control a parameter in the synth. In this case, the EXP and LIN inputs take an input and use that signal to control the volume. The LIN input affects the output linearly, for a linear signal input, while the EXP input adjusts it exponentially. The cool thing about modular synths is that there’s no hard distiction between audio and CV signals. You could use an audio signal as a CV, or vice versa. In this case, we won’t be using either CV input just yet. Just crank the volume way down and move on to the next module, which is the “VCO-1”.
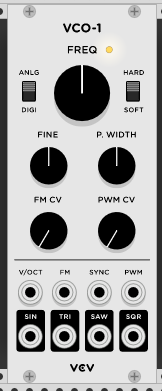
VCO stands for Voltage Controlled Oscillator. This is your run-of-the-mill basic sounds source. It outputs a signal that “oscillates”, or cycles, at a certain frequency. It outputs 4 waveforms: sine, triangle, sawtooth, and square. It outputs all four of them at the same time; you can use any or all of them. A graph of the signals would look like this:
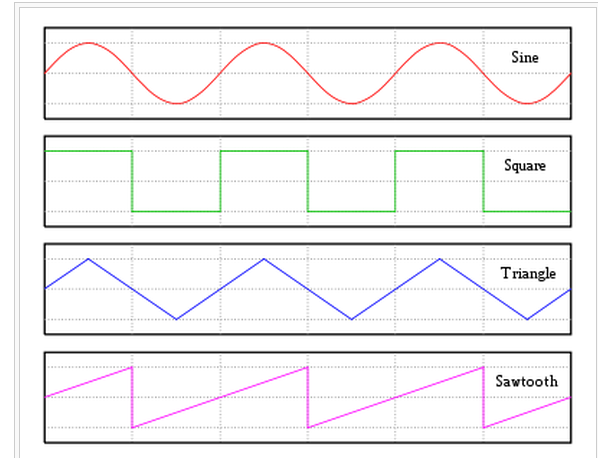
Image from VI-Control.net.
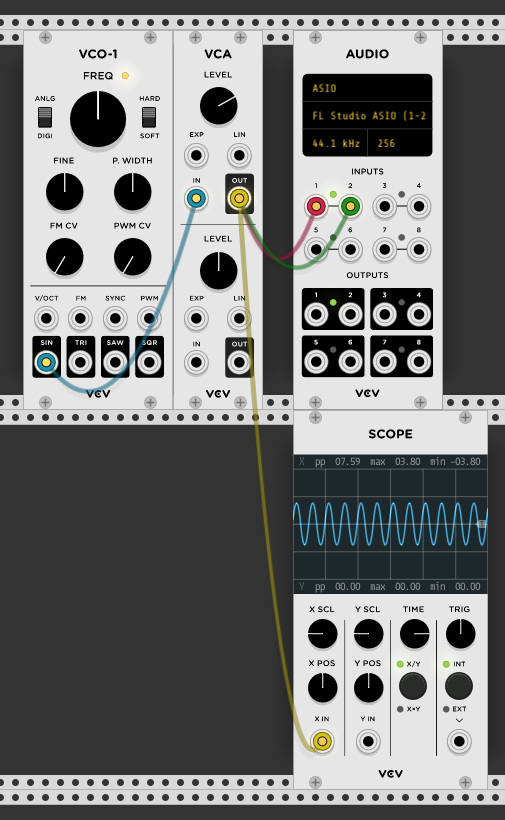
Now, let’s hear what these waveforms sound like! Drag a cable from the SIN output to the IN input on the VCA. Connect the OUT jack from the VCA to both input jacks on the audio module (left and right). Here’s a tip: when connecting an output to multiple inputs, drag from the destination, to the source. If you try to connect from the output it’ll move the existing connection. You’ll see what I mean when you start fiddling with the cables. Here’s what our setup looks like:
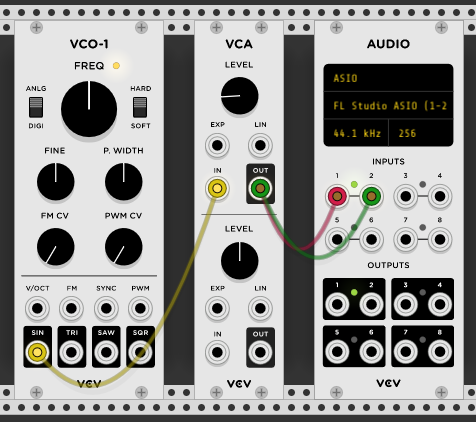
If you turn up the knob on the VCA, you should hear a constant tone from your speakers. If you don’t hear anything, try changing the output devices until you hear something.
Now try listening to the other waveforms! Connect the TRI, SAW, and SQR outputs to the VCA and listen to each of them. NOTE: the sine output is the softest sounding by far. Each other signal will be harsher, so adjust your VCA accordingly.
Let’s add a scope module so we can visualize these waveforms. Add the “Scope” module, and hook the output of the VCA to the “X IN” input.
As you change the waveform or volume, you’ll see the signal on the scope change. Try turning that big FREQ knob on the VCO. Predictably, it changes the frequency (pitch) of the oscillator. You can see the waveform on the scope looks slightly different from the chart I showed above. That’s because the oscillator is in “analog mode”. That means it’s emulating the kinds of distortion that usually occur in analog oscillator circuits. If you want the pure digiatal, “perfect” waveforms, click on the ANLG/DIGI switch on the upper left of the VCO. Some people (myself included) think the analog versions sound a little nicer. You can decide for yourself once you’ve done some more fiddling.
Now, obviously, turning that knob to select the frequency isn’t an ideal solution. CVs to the rescue! Right-click and add the “MIDI-1” module.
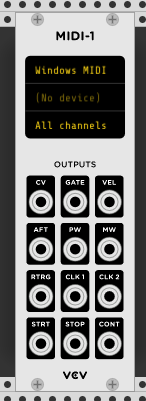
This module creates CV signals based on MIDI input. MIDI stands for Musical Instrument Digital Interface, and it’s a protocol for controlling electronic instruments. If you’re already the music-savvy type, you might have a MIDI keyboard already. In that case, hook it up to your computer and select the device on the module. If not, don’t worry, we can still make some MIDI signals in software.
At the time I’m writing this, VCV Rack doesn’t have any way to create MIDI signals using your computer keyboard. So, we’ll use a different solution. There’s an easy way and a hard way.
The simple way is to install the ImpromptuModular plugin. Jump to the end of this article and follow the instructions for installing the plugin, then add the “Twelve-Key” module. From here on out, ditch the MIDI module and use the CV and GATE jacks on that module instead. You can click on the keys to generate signals, and use the + / - buttons to change the octave.
Alternatively, for a more robust solution, download VMPK. It’s a freeware program for creating MIDI signals. It too is available on Windows, Linux, and MacOS. Now, we also need a way to get those signals into VCV Rack. On Windows, download and install LoopBe1. It’s a virtual MIDI driver that will allow us to get the MIDI signals from VMPK to VCV Rack. On Linux, try using JACK. On MacOS, uh, you’re on your own, sorry. I’m not really familiar and I don’t have a Mac handy.
Using VMPK and LoopBe1, open VMPK and close and reopen VCV Rack. (VCV Rack should save your current rack setup and reload it when you open it next). In the MIDI module, select “Windows MIDI” and “LoopBe Internal MIDI 0”. You should now be able to click on keys in VMPK or type on your keyboard with VMPK selected to send MIDI signals to VCV rack. Now let’s get back to actually hooking those signals up.
Okay, back to business! There’s a lot of signals on the MIDI module, but we’re mainly interested in CV and GATE. CV is a signal representing the pitch of the current note played, and GATE is signal representing whether a key is pressed or not. Hook up the CV signal to the V/OCT input on the VCO. V/OCT refers to a common standard in hardware modular synths, where 1 volt equals one octave. So a +2 volt signal would correspond to an adjustment of +2 octaves. Now, hitting keys should change the pitch of the oscillator. We’re getting closer!
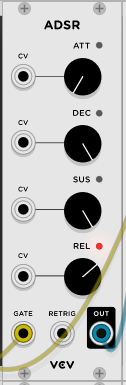
Now, we need a way to actually turn the oscillator off when we aren’t hitting a key. We’ve already got a GATE signal, and a VCA which can make things quieter, but we’re going to use a special module to give us more control over how the sound changes when we press a key. Add an “ADSR” module.
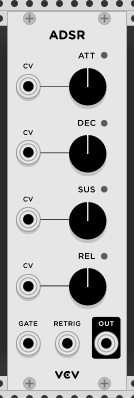
In case you haven’t noticed yet, modular peeps love their acronyms. ADSR stands for Attack Sustain Decay Release, which are the four parameters of an “envelope”, which is a curve dictating how a sound changes when you press a key. Here’s a graph of the curve:
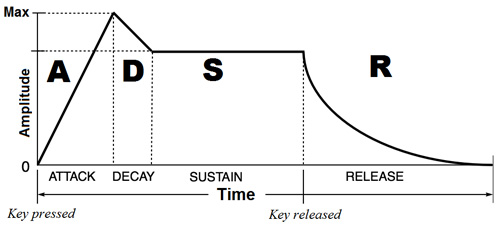
Image from daviddarling.info.
“Attack” is the fade-in time when you press a key. The longer the attack, the slower the note fades in. At zero attack, the note comes on instantly.
“Sustain” is the one parameter here that isn’t a duration – it’s the volume that the note holds at. “Decay” is the tine it takes to fade to that amount. With sustain and decay at max, the note just holds at full volume. With sustain at zero, the note fades out according to the decay time.
“Release” is the time the note takes to fade after you release the key.
Together, these parameters define an “envelope”. This signal can be used to control any parameter. It also can be triggered by things other than a key press, but that’s what we’re using it for here. We’ll use it to control the VCA. Connect the OUT jack on the ADSR to the EXP input on the VCA. Then, connect the GATE output from the MIDI module to the GATE input on the ADSR. That way, the GATE signal will “trigger” the ADSR – causing it to generate an envelope controlling the VCA.
Now, when you press a key, you should hear a note fade in and out, according to the parameters on the ADSR. Fiddle with them until you’re comfortable with how they work.
Now that we’ve got a basic note set up, lets make it a bit more interesting. Add a “VCF” module.
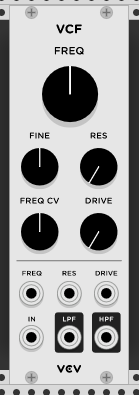
VCF stands for “Voltage-Controlled Filter”. This is used to “filter” a sound, which means to remove certain frequencies. This filter is a combination low-pass and high-pass filter, outputing both at once. A high-pass filter is one that allows high frequencies through, but filters out lower frequencies. A low-pass filter is the opposite – it filters high frequencies, letting the lows pass. The point where the filter starts to filter these frequencies, as well as the “sharpness” of the filter, are adjustable.
Connect the output of the VCA to the IN jack on the VCF, and the VCF’s LPF jack to the output & scope. This will make the signal pass through the (low-pass) filter before going to the output.
Choose a harmonically-rich waveform like the SAW or SQR from the VCO, that way you can actually hear what the filter is doing. Turn the FREQ knob all the way down. Since we’re using the low-pass output, this will filter out basically everything. As you turn the knob back up, it will let more and more frequencies through, from low to high. Listen carefully to how this sounds. If you want, set the parameters on the ADSR to these:
This will give you a nice constant tone to mess with the filter. You can also change the RES knob on the filter, which control’s the filter’s “resonance”, which basically means how “sharp” the filter is. Turn it up and listen to how the filter sounds, especially as you change the FREQ.
If you want, go ahead and try the HPF jack on the filter. This is the high-pass output, and is basically the opposite of the low-pass. It should be pretty obvious when you hear it.
Now, let’s use another ADSR for the filter. Right-click on the ADSR and choose “Duplicate”. Connect the MIDI GATE to the new ADSR’s GATE, and the ADSR’s OUT to the VCF’s FREQ jack. Unlike the VCA, the filter has a knob to control the amount the CV affects the filter frequency. If we turn the knob up, the envelope increases the filter frequency, if we turn it down, it does the opposite. Turn the FREQ CV knob all the way up, and the FREQ knob all the way down. This way, the filter will start “closed”, and the ADSR will “open” it up. Now fiddle with with ADSR and VCF settings and see how they affect the sound!
At this point, I’m sure you have some ideas about things to explore. Go for it! With all the different things to connect, there’s an infinite amount of sounds to explore. If you don’t know what any of the knobs or jacks do, just google the name of the module and the name of the control. Unfortunately the official documentation is very lacking (most modules are completely missing), but googling “VCO SYNC jack” will probably bring up what you need.
Oh. And here’s where it gets really fun. VCV Rack is open source, and lots of users have created their own modules for it! You can download them here. Make an account, and log in on the website and in VCV rack. Click the “+ Free” button on any free plugins that catch your fancy, then click “update plugins” at the top of the VCV Rack window. The plugins will sync automatically.
Here’s a few of my suggestions:
- Audible Instruments (modules made by Mutable Instruments, an actual hardware synth manufacturer!).
- Befaco (also based on real hardware modules!).
- Sonus Modular (just look for “Sonus Modular” in the plugins list).
- “Parable Instruments” (the Neil module is pretty cool)
- “ImpromptuModular”
- me??
Haha, that’s right! I’m almost certainly going to be writing my own modules for this, so keep an eye out!
Good luck, and have fun making music!
i did make a few modules, but they’re not currently available online anywhere. feel free to send me a message at hello@trashbyte.io or cybre.space if you’re interested and i’ll release em